
Doc Green’s Woodturning Site

Exposure Controls, Part 1
Focal Length, Aperture, and f-number
Focal Length, Aperture, and f-
Many turners photograph their work, but not all are photography enthusiasts who have a good understanding of the basic exposure controls. Things like f-
This article, in three parts, is my attempt to explain the relationship between focal length, aperture, f-
Way back in the days of when, it became apparent that photographic films were not very sensitive to small differences in the amount of light striking the film in the course of making an exposure. In fact, the quantity of light had to be very nearly doubled (or cut in half) to make a difference in lightness or darkness that was easily noticeable in the image.
This characteristic of film sensitivity still exists and carries over into the digital revolution. But it’s not a bad thing. In fact, it may be a good thing because the brightness of a typical scene or subject varies widely. For example, the brightness of the sky with a few white clouds scattered around is about 32 times as much as the grass in the shadow of a tree under the same sky.
If the film were more sensitive to differences in brightness, it would be virtually impossible for a photograph to capture detail in the sky and in the shadow at the same time. If the sky appeared normal, the shadow would be coal black. If the exposure was set so the shadow appeared normal, the sky would be snow white.
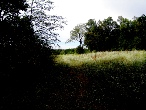
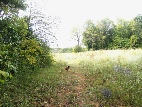
The following photos show what the effect might be like. The first is a “normal” shot of a fairly bright sky and deep shadows. The second is exposed for the sky (simulated), and detail is lost in the shadows. The third is exposed for the shadows; all detail in the sky is lost. 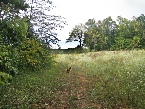


And so we have the phenomenon of the factor of 2: either double it or cut it in half to make a difference. This factor of 2 forms the basis for the standard shutter speeds, aperture diameters, and film sensitivity – the three items that must be considered and set appropriately in order to take a picture.
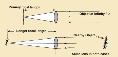
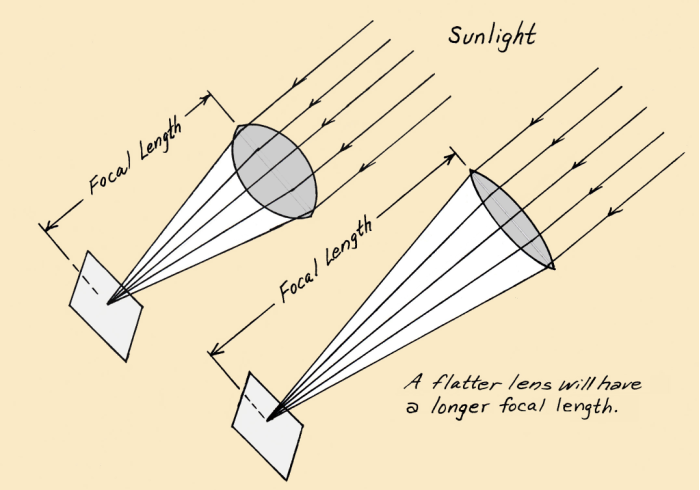
The focal length of a lens. If a magnifying glass (or other simple convex lens) is held in the sun a distance in front of a sheet of paper, a bright spot will appear on the paper. If you get the distance between the lens and the paper just right, the bright spot will shrink almost to a point, which will be very bright and may be rather warm. The bright spot is, in fact, a tiny im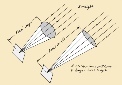 age of the sun. The distance from the lens to the paper is the focal length of the lens.
Not all lenses have the same focal length, which is determined in part by the curvature of the two surfaces of the lens. If the lens is thick and chunky, which is to say the surfaces are highly curved, the focal length will be short. On the other hand, if the curvature is slight, giving a lens that is almost flat, the focal length will be long.
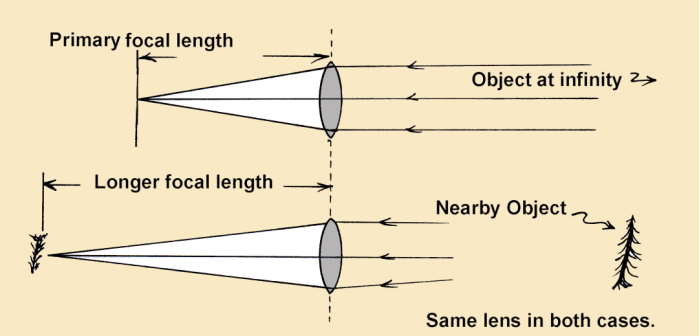
The primary focal length. In the situation where we hold a lens in the sun, the sun is assumed to be infinitely far away and the distance between the lens and the paper will correspond to this distance. On the other hand, if we go out at night and hold the lens in the light of a nearby street lamp, we’ll find the distance between the lens and the paper must be greater to produce the small circle of light on the paper.
Therefore, a lens does not have a single focal length. The focal length is longer for objects closer to the lens. It will be its shortest when the object is at an infinite distance, and this particular one is known as the primary focal length. It is the focal length you see in lens specifications.
This variation of focal length with object distance explains why you have to focus a camera. Focusing involves moving the lens in and out, closer to or farther away from the film or image sensor.
The aperture. In simple terms, the aperture is the opening the light passes through as it enters the camera. In a camera lens, the opening is forme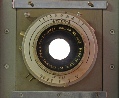 d by the diaphram and the diameter of the opening is adjustable. The aperture and the shutter, together, control the amount of light that enters the camera during an exposure.
In practical photography, we do not refer to aperture diameters directly. Instead, we use a system that involves a bunch of numbers called f-numbers or f-stops. Believe it or not, dealing with these numbers, ... 2, 2.8. 4, 5.6, 8, 11 ..., makes things a lot simpler in the long run.
For now, let’s just say that the f-stop setting controls the diameter of the aperture. Understanding why it makes things simpler requires the addition of a few more ideas. So, let’s proceed and knock them out one at a time. Here’s the first:
Image brightness. This refers to the brightness of the image cast on the film during the exposure. It does not refer to the brightness of the final photograph, although the two may be distantly related.
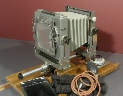
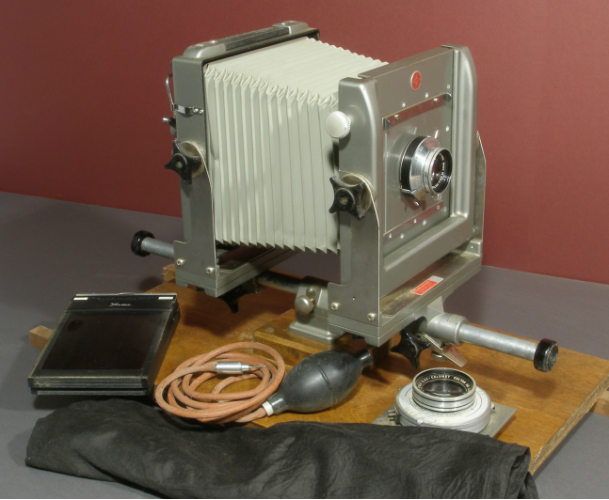
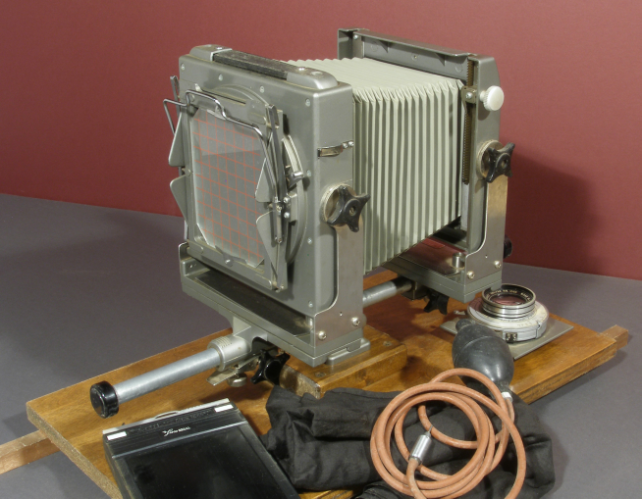
Let’s assume we have an old view camera to play with, one with a lens holder, a big bellows, and a ground glass plate at the rear on which we view the image we hope to capture. For effect, we can include a dark cloth that we’ll get under so the faint image on the ground glass will show up better.
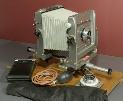
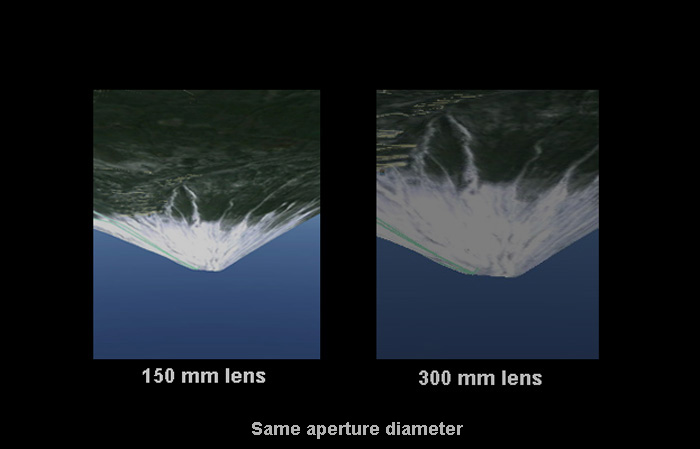
Further, let’s suppose we have two lenses of the same diameter but with one having a focal length of 150 mm and the other 300 mm. We put the 150 mm lens on the camera and aim it at a distant mountain with a snow-covered peak. We open the lens, crawl under the cloth, and adjust the extension of the bellows until the ground glass is about 150 mm from the lens. At that point, the mountain comes into focus – upside down.
If we were actually going to take a picture, we would focus carefully, close the shutter, insert a film holder, remove the dark slide to uncover the film, make the exposure, replace the slide, and finally, remove the film pack so we could set up the next shot. Doesn’t take but a minute to do.
Now, let’s install the 300 mm lens and make a comparison. First, we have to extend the bellows from 150 to 300 mm to get the image to come into focus. We notice that this time, the image on the ground glass is much larger , twice as big in fact. We don’t see as much of the mountain, but what we do see is bigger. However, the image is not nearly as bright and easy to see. In fact, it is only one-
fourth as bright as it was with the 150 mm lens.
Remember, our two lenses are the same diameter; the aperture for one is the same as the other. And the mountain is the same as before, so the same amount of light enters the camera in the two cases. So what’s different? Answer: the focal length.
For the 300 mm lens, the light entering the camera is spread out over a much larger image (even though not all the image falls on the ground glass). The more the light spreads out, the dimmer the image will be.
This makes the point that aperture diameter alone is not enough to specify the brightness of the image and its effect on the resulting exposure. Somehow, the focal length has to enter the picture as well.
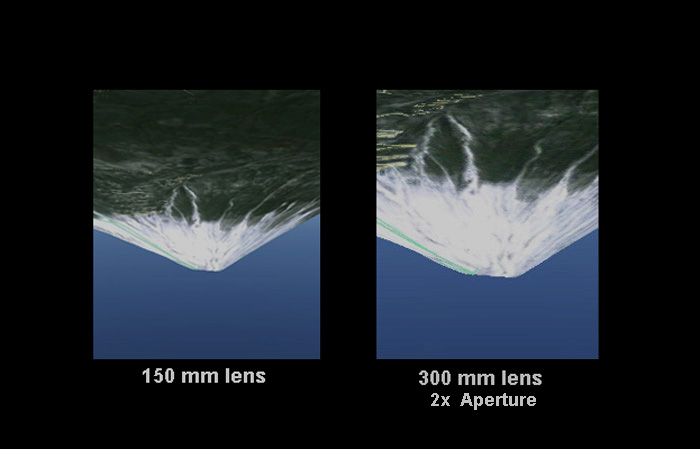
Aperture and focal length. Suppose we have another 300 mm lens, this one exactly twice as large in diameter as the one we just tried. Put it on the camera and examine the image. Lo and behold, now the image is exactly as bright as the image produced by the 150 mm lens. We made the aperture larger, and the image got brighter.
When we double the diameter of a circle, its area gets multiplied by 4. Therefore, the larger lens admits 4 times as much light as the one with the smaller diameter, and the image brightness winds up equal to that of the 150 mm lens.
Now let’s assign actual number diameters to the lenses. Let each one of the first two have a diameter of 37.5 mm. The larger 300 mm lens will then have a diameter of twice 37.5, which is 75 mm.
We know that the image brightness of a 150 mm lens with a 37.5 mm aperture will be the same as that of a 300 mm lens with a 75 mm aperture. What’s the same about these combinations? Try dividing the focal length by the aperture for each one and see what you get.
150 mm divided by 37.5 gives 4. Likewise, 300 divided by 75 gives 4. The ratio of the focal length to the aperture is the same for the two lenses that produced the same image brightness. In fact, any two lenses with the same focal length to aperture ratio will produce the same image brightness.
Photographers have given a name to this ratio. Guess what they call it:
the f-number.
f-number = focal length / aperture diameter
And what does the f-number relate to? Image brightness. Any two lenses with the same f-number will produce the same image brightness, for the same scene, of course.
The focal length of a lens. If a magnifying glass (or other simple convex lens) is held in the sun a distance in front of a sheet of paper, a bright spot will appear on the paper. If you get the distance between the lens and the paper just right, the bright spot will shrink almost to a point, which will be very bright and may be rather warm. The bright spot is, in fact, a tiny im
 age of the sun. The distance from the lens to the paper is the focal length of the lens.
Not all lenses have the same focal length, which is determined in part by the curvature of the two surfaces of the lens. If the lens is thick and chunky, which is to say the surfaces are highly curved, the focal length will be short. On the other hand, if the curvature is slight, giving a lens that is almost flat, the focal length will be long.
The primary focal length. In the situation where we hold a lens in the sun, the sun is assumed to be infinitely far away and the distance between the lens and the paper will correspond to this distance. On the other hand, if we go out at night and hold the lens in the light of a nearby street lamp, we’ll find the distance between the lens and the paper must be greater to produce the small circle of light on the paper.
Therefore, a lens does not have a single focal length. The focal length is longer for objects closer to the lens. It will be its shortest when the object is at an infinite distance, and this particular one is known as the primary focal length. It is the focal length you see in lens specifications.
This variation of focal length with object distance explains why you have to focus a camera. Focusing involves moving the lens in and out, closer to or farther away from the film or image sensor.
The aperture. In simple terms, the aperture is the opening the light passes through as it enters the camera. In a camera lens, the opening is forme
 d by the diaphram and the diameter of the opening is adjustable. The aperture and the shutter, together, control the amount of light that enters the camera during an exposure.
 In practical photography, we do not refer to aperture diameters directly. Instead, we use a system that involves a bunch of numbers called f-
For now, let’s just say that the f-
Image brightness. This refers to the brightness of the image cast on the film during the exposure. It does not refer to the brightness of the final photograph, although the two may be distantly related.
Let’s assume we have an old view camera to play with, one with a lens holder, a big bellows, and a ground glass plate at the rear on which we view the image we hope to capture. For effect, we can include a dark cloth that we’ll get under so the faint image on the ground glass will show up better.
Further, let’s suppose we have two lenses of the same diameter but with one having a focal length of 150 mm and the other 300 mm. We put the 150 mm lens on the camera and aim it at a distant mountain with a snow-
If we were actually going to take a picture, we would focus carefully, close the shutter, insert a film holder, remove the dark slide to uncover the film, make the exposure, replace the slide, and finally, remove the film pack so we could set up the next shot. Doesn’t take but a minute to do.
Now, let’s install the 300 mm lens and make a comparison. First, we have to extend the bellows from 150 to 300 mm to get the image to come into focus. We notice that this time, the image on the ground glass is much larger
 , twice as big in fact. We don’t see as much of the mountain, but what we do see is bigger. However, the image is not nearly as bright and easy to see. In fact, it is only one-
Remember, our two lenses are the same diameter; the aperture for one is the same as the other. And the mountain is the same as before, so the same amount of light enters the camera in the two cases. So what’s different? Answer: the focal length.
For the 300 mm lens, the light entering the camera is spread out over a much larger image (even though not all the image falls on the ground glass). The more the light spreads out, the dimmer the image will be.
This makes the point that aperture diameter alone is not enough to specify the brightness of the image and its effect on the resulting exposure. Somehow, the focal length has to enter the picture as well.
Aperture and focal length. Suppose we have another 300 mm lens, this one exactly twice as large in diameter as the one we just tried. Put it on the camera and examine the image. Lo and behold, now the image is exactly as bright as the image produced by the 150 mm lens. We made the aperture larger, and the image got brighter.
When we double the diameter of a circle, its area gets multiplied by 4.
 Therefore, the larger lens admits 4 times as much light as the one with the smaller diameter, and the image brightness winds up equal to that of the 150 mm lens.
Now let’s assign actual number diameters to the lenses. Let each one of the first two have a diameter of 37.5 mm. The larger 300 mm lens will then have a diameter of twice 37.5, which is 75 mm.
We know that the image brightness of a 150 mm lens with a 37.5 mm aperture will be the same as that of a 300 mm lens with a 75 mm aperture. What’s the same about these combinations? Try dividing the focal length by the aperture for each one and see what you get.
150 mm divided by 37.5 gives 4. Likewise, 300 divided by 75 gives 4. The ratio of the focal length to the aperture is the same for the two lenses that produced the same image brightness. In fact, any two lenses with the same focal length to aperture ratio will produce the same image brightness.
Photographers have given a name to this ratio. Guess what they call it:
the f-
f-
And what does the f-