
Doc Green’s Woodturning Site

To cut a log on a bandsaw, it must be kept from rolling by using various chocks and wedges. Further, as the log advances into the blade, the chocks and wedges have to be pushed along with it, and this is not always an easy task.
Using a sled makes this operation far less hazardous. You can block up a piece on the sled and then push the entire arrangement through to make the cut. The blocks and wedges simply ride the sled, along with the log.
Two sleds are described in this article. The short one may be used for cross cutting logs, for example. The longer one is used to split a log in half, parallel to its length, or to cut “boards” from a section of a log. The short one is described first.
After years of use, the slots for the blade on my sleds got ragged out to an embarrassing degree, so I did a bit
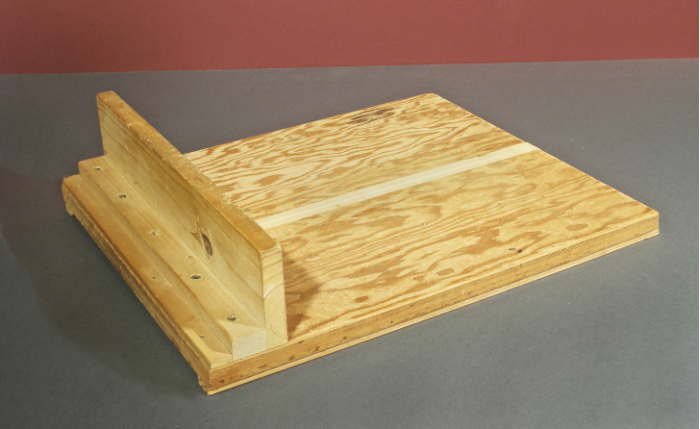
 of a repair. The strip of white wood (spruce) that runs down the middle of the sleds is an insert I installed so I could cut a new slot.
 The base of these sleds can be made from plywood, MDF, or whatever sheet material you have available. A strip attached to the bottom fits into the miter slot in the bandsaw table and guides the sled. A bridge at the trailing end gives added strength.
A Short Bandsaw Sled
Base. Cut a piece of plywood to a width comparable to the width of your bandsaw table and to a length slightly longer than the table. The additional length gives a place for attaching the bridge without taking up a lot of working space on the sled. The exact dimensions are not critical.
Guide strip. Prepare a guide strip that will fit the miter slot. Most miter slots are 3/8” deep and 3/4” wide. Make the strip as long as the length of the base. Check to see that it slides easily through the slot without tending to bind.
The guide strip should be located on the base so that when the strip drops into the slot, the base will be very nearly centered on the blade.
The method I use to install it is to draw a line on the base where the strip should go, then screw each end of the strip to the base. At this point, the center of the strip can be pushed from side to side. Next, I place a straightedge against the strip and hold it there while seating one or two additional screws in the middle of the strip.
Bridge. The bridge can be as simple as a short length of a “2 x 4” screwed to the trailing end of the sled. In use, the slot for the blade weakens the base considerably. The bridge helps hold the two sides together and also provides a convenient grip for pushing the sled.
Cut the slot for the blade. After the guide strip and bridge are installed, push the sled through to cut the slot for the blade. While making this cut, ensure that the sled moves freely without having the guide strip bind in the slot. If binding occurs, adjust the guide strip as required. A bit of paste wax applied to the strip might make it run more smoothly.
Using the sled. If you intend to cross cut a log or other round piece of wood, be aware that when the blade enters the cut, the log will tend to roll away from you (and into the blade). As the blade nears the end of the cut, the log will tend to roll toward you. This means the log must be blocked in both directions. That is, put blocks or wedges on both sides of the log.
A Longer Bandsaw Sled (An original design)
The longer version makes it possible to split a log parallel to its le
 ngth, or to cut “boards” from a section of a log. The design makes it fairly quick and easy to shift the log sideways for the next cut after a board has been sawn from the side of the log.
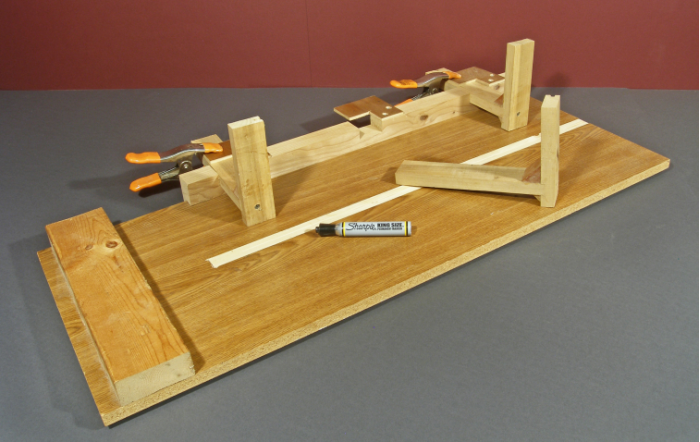
 The idea is to use three movable backstops that are brought up to contact the left side of the log. Wedges chocked under the log on the other side keep it in position against the backstops. This method, although simple, works quite well. My observation, after using the sled with logs of all shapes and sizes, is that nothing more is required.
The base. The base on my sled is 15.5” wide and 38” long. It’s made from a scrap piece of particle board with a laminated surface. Using the sled, I can cut a log 30” long. For your sled, choose a length that will suit your needs.
Attach a strip to run in the miter slot and install a bridge.
Select the material for the backstops. Use any convenient hardwood. I used poplar strips 3/4” thick and 1.75” wide. My sled uses three backstops.
Clamping strip. This strip, 1.5” x 1.5”, is attached to the left ed
 ge of the base. It has notches that the horizontal parts of the backstops pass through. Make the notches as deep as the thickness of the material used to make the stops so that everything winds up flush at the top of the clamping strip. An L-
Make the backstops. Refer to the drawing to see the other dim
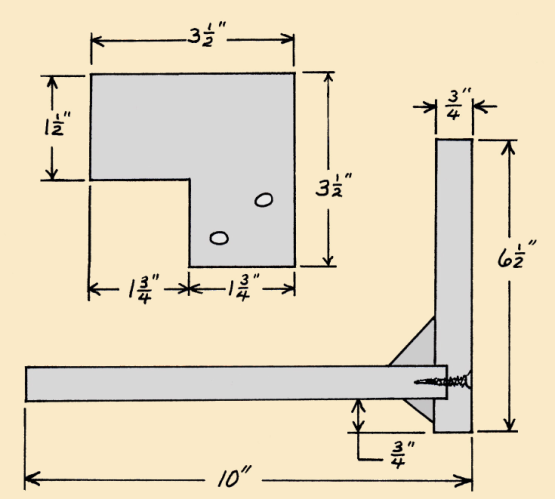 ensions. Note the triangular blocks between the vertical and horizontal parts. These are epoxied in place and add greatly to the strength of the joint.
 Clamping plates. Cut a clamping plate for each stop out of 1/4” or 3/8” plywood. Attach them to the clamping strip with a couple of wood screws and a spot of wood glue.
Cut the slot. You are now ready to run the sled through the blade to cut the slot. However, before you attempt this, consider that the sled will tend to tilt forward as you near the end of the cut. Be prepared to hold the back of it down, or better, go ahead and make an outfeed roller at this point. You will need the outfeed roller when you are using the sled to slice a log, so you might as well make it now. (See the article, Infeed and Outfeed Rollers.)
Using the sled. With the sled supported in front of the blade by the infeed roller, place the log on the sled. Sight the line you wish the blade to travel, and position the log. Move the backstops up against the log and clamp them in place. Block up the opposite side (right-
If it is desired to cut a log shorter than the distance between the backstops, simply place a longer plank between the backstops and the short log, and slide the log up against the plank.
A bandsaw blade sometimes tends to drift sideways and cut at an angle to the direction the wood is fed into the blade. In resawing operations, the wood is guided past a pivot so corrections can be made during the cut.
The sled does not allow for adjusting the feed direction. However, this has not been a significant problem as long as the blade is sharp and properly tensioned with the feed rate kept within reason.
Turn the saw Off and let the blade come to a complete stop before trying to remove the board just cut or attempting to adjust the stops. Working with ungainly pieces near the moving blade is inviting an accident. Don’t do it.