

Drilling the Hole in a Tool Handle
The methods described here use the lathe with a drill bit held in a Jacobs chuck. The Jacobs chuck may be installed either at the headstock or tailstock, depending on the method used.
The complicating factor is the length of the handle compared to the diameter of the tenon for the scroll chuck, and a chuck cannot reliably hold a piece that long. A small sideways force at the unsupported end can cause the handle to go off center. Further, once the handle is off center, centrifugal force may make the situation worse and the handle could possibly fly off the lathe.
An additional complication is that the drill bit may wander at th e start of drilling
so that the resulting hole is off center. We work around this by drilling the hole
before turning the outside profile of the handle to its final dimensions. After the
hole is drilled, the handle is again placed between centers with a cone center at
the tailstock inserted into the hole. This centers the blank on the hole for the
final shaping.
e start of drilling
so that the resulting hole is off center. We work around this by drilling the hole
before turning the outside profile of the handle to its final dimensions. After the
hole is drilled, the handle is again placed between centers with a cone center at
the tailstock inserted into the hole. This centers the blank on the hole for the
final shaping.
Selecting a Drill Bit
Type? The ones commonly available are Forstner, spade, brad point, pilot point,
and the familiar twist drill. Assuming all the types are available, which one shall
we use?
point, pilot point,
and the familiar twist drill. Assuming all the types are available, which one shall
we use?
First of all, the drilling will be into end-
A brad point bit tends to be too aggressive and sometimes can tend to self feed. In the worst case, the bit can screw itself into the wood and become embedded. We must avoid this at all costs, so brad point bits are out, and we’ll also reject the pilot point bits because of their similarity to the brad point.
The one type remaining is the familiar twist drill. It is the best choice for drilling into end grain. Its one disadvantage is that it doesn’t have a sharp point like the others so locating it precisely takes a bit more care.
Size? Measure the shank of the tool and compare it to the diameter of the bit you
intend to use. Drill a hole into a piece of scrap and test the fit. If you must,
err on the side of making the hole too large rather than just a bit too small. It’s
a simple matter to fill in a large hole with epoxy, but enlarging a hole by re-
Starting On- st drill from drifting off center. However, a countersink
in a hand-
st drill from drifting off center. However, a countersink
in a hand-
The fact is that a little drift or wandering at the start will make no difference. The error can be corrected when the blank is again mounted between centers, centered on the hole by a cone center at the tailstock.
Speed? Run the lathe slowly when drilling with a large bit. A speed of about 500 RPM is good. Clear the chips frequently.
Do it: Drill the Hole.
Six different methods, or variations, for drilling the hole are described below. You get to pick the one that appeals to you.
Method 1A: the direct approach. Drill the hole with the tailstock end of the blank
unsupported. Do thi s only if you can slow your lathe down to about 100 RPM.
Mount the handle in a scroll chuck with the chuck jaws gripping the tenon at the back end of the handle. Use a point center at the tailstock to align the piece.
Remove the point center and install the Jacobs chuck and drill bit in the quill of the tailstock. Bring the bit up until it makes contact with the center point of the handle where the hole is to be drilled.
Set the lathe for a very low RPM, preferably around 100. Start the lathe and advance the bit to drill the hole. Once the hole is started, you can increase the RPM to about 500.
Be aware that if you run the lathe at high speed and the handle begins to run off center before the drill bit is engaged enough to provide stability, it is apt to come off the lathe, rather violentlly.
This method is not without risk, but once the bit engages the wood, the bit itself will tend to stabilize the handle. Your odds are better if the wood is solid and hard with the chuck jaws really tight. I’ve had good luck with this method for handles up to about 10” in length. I have not tried it with longer handles.
Method 1B: drill a starter hole. Use a hand drill to drill a hole in the end of the blank, maybe 3/8” deep. Then, when preparing to drill the hole for the tool, stick the drill bit into the hole before starting the lathe. The bit will keep the blank from going off center.


You can use a Forstner or spade bit to drill the starter hole. Even though these do not do well in end grain, they have a sharper point than a twist drill and are easier to position accurately. Drilling into the blank a mere fraction of an inch should not be difficult.
Method 2: use a centering ring. This is an addition to the method above. A centering ring is placed over a tenon turned on the end of the blank to stabilize it before the drill bit is engaged. The details are shown in the following diagram and photo.


To drill the hole in the handle, install the handle between a scroll chuck and a point center. If you have not done so already, turn a short tenon on the end of the handle for the centering ring to fit over. If you make the tenon diameter 1.25”, it can be turned away later without interfering with the final shaping of the handle.
Remove the live center and install the Jacobs chuck and drill bit. Place the centering ring on the tenon on the end of the handle.
Move the tailstock forward so the drill bit passes through the hole in the centering ring and makes light contact with the end of the handle. Spin the lathe by hand to see that everything is in order, and then start the lathe and begin drilling the hole. After the hole has been drilled to a depth of 1/2” or so, the centering ring can be removed so the chips will clear more easily.

To turn a centering ring: (1) Begin with a short spindle blank about 1.5” long mounted between centers. (2) Turn a tenon on each end of the blank.
(3) Mount the blank in a scroll chuck and form the recess that fits over the tenon
on the handle. I use a 1.25”-
recess that fits over the tenon
on the handle. I use a 1.25”-
 (4) Reverse the blank in the chuck and drill the hole for the drill bit, using
the same bit that will be used to drill the hole in the handle.
(4) Reverse the blank in the chuck and drill the hole for the drill bit, using
the same bit that will be used to drill the hole in the handle.
Method 3: use a spindle steady. Another method is to use a small spindle steady
to stabilize the front end of the handle. The minute or so it takes to set up the
steady is a small price to pay for the added security. This assumes, of course,
that you have such a steady.
handle. The minute or so it takes to set up the
steady is a small price to pay for the added security. This assumes, of course,
that you have such a steady.
Install the steady on the lathe and then mount the handle between a scroll chuck and a point center at the tailstock. Set the rollers of the steady against the piece. Then install the Jacobs chuck in the tailstock and drill the hole.
Method 4: use a safety fixture instead of a steady. If you don’t have a small steady,
you can use a much simpler shop-


The fixture consists of a vertical panel attached to the ways of the lathe with a hole that the handle passes through. The hole is slightly larger than the blank so that, normally, no contact is made between the blank and the fixture.
I use the base of a string steady to hold a small rectangle of 1/4” plywood in which I drill the hole. Once the fixture is installed, the procedure for drilling is the same as for Method 1A above.
Drilling a Store-
You can purchase finished wooden handles that come complete with the ferrule already
installed. However, you must drill the hole for the tool. The center will be marked
at the ferrule end where you drill the hole.
with the ferrule already
installed. However, you must drill the hole for the tool. The center will be marked
at the ferrule end where you drill the hole.
There is no convenient way to install the handle in a scroll chuck without risking damage to the finish. Therefore, we cannot use the methods described above.
What I do is install the Jacobs chuck and drill bit in the headstock spindle and
insert a cup center into the Morse taper of the tailst ock. Then, with a centering
ring placed over the ferrule of the handle, the handle is captured between the drill
bit and the cup center. I grip the handle with my left hand to keep it from rotating
during the drilling operation and advance the handle onto the bit by turning the
handwheel of the tailstock with my right hand.
ock. Then, with a centering
ring placed over the ferrule of the handle, the handle is captured between the drill
bit and the cup center. I grip the handle with my left hand to keep it from rotating
during the drilling operation and advance the handle onto the bit by turning the
handwheel of the tailstock with my right hand.
No major effort is required to keep the handle from rotating, and even if it does begin to rotate, it will remain captured between the drill bit and the cup center. There is only one senario with this method that could get you into trouble, and big trouble at that.
If the bit grabs and screws itself into the handle, the handle will be pulled toward the bit. You will no longer be able to hold it. If the handle is pulled out of the cup center, it will quickly go off center and then whip around violently until it goes flying off the lathe.
We can do two things to be sure this does not happen. First, we use a drill bit that does not tend to self feed. Brad point and pilot point bits must not be used. If you wonder about a particular bit, mount it in a hand drill and try drilling into the end grain of a piece of scrap to see how it behaves.
Second, we use a shop- fairly deep to reduce
the chances that the end of the handle could be pulled out of it. Directions for
turning the cup center are given farther down.
fairly deep to reduce
the chances that the end of the handle could be pulled out of it. Directions for
turning the cup center are given farther down.
The Start/Stop switch on my lathe is located on the headstock. This requires me to do a bit of a dance just to start the lathe. After the handle is installed between the drill bit and cup center, I hold it with my right hand while starting the lathe with my left. Then I grip the handle with my left hand and move my right hand to the tailstock hand wheel to advance the handle and begin the drilling.
Once the hole is drilled, I retract the handle by unlocking the tailstock and pulling it and the handle away from the drill bit. I can then stop the lathe at my leisure.
You can use this same method to drill the hole in a handle you make, of course, so
this adds another method to those given above for drilling a hole in a shop-
Precaution: Suppose you drill the hole and, by chance, it is just a hair too small.
If you decide to re-
Turning a Cup Center
Making a cup center just to drill a hole may seem like a lot of trouble. However, it doesn’t take long to do, it’s in the cause of safety, and it involves turning and making shavings, which is fun. Besides, if you make one, you can use it the rest of your life if you don’t lose it. So, don’t lose it.
Here’s the procedure:

(1) Install a spindle blank about 4.5” long and 2.25” in diameter between centers. True it up and turn a tenon at each end.
(2) Mount the blank in a scroll chuck. H ollow the cup part. You can use a Forstner
bit to drill it out or hollow it out the way you hollow a box. Size the diameter
of the hollow to fit loosely over the end of the tool handle. Hollow it to a depth
of about 1.5”.
ollow the cup part. You can use a Forstner
bit to drill it out or hollow it out the way you hollow a box. Size the diameter
of the hollow to fit loosely over the end of the tool handle. Hollow it to a depth
of about 1.5”.
(3) Reverse the blank in the chuck. Bring up the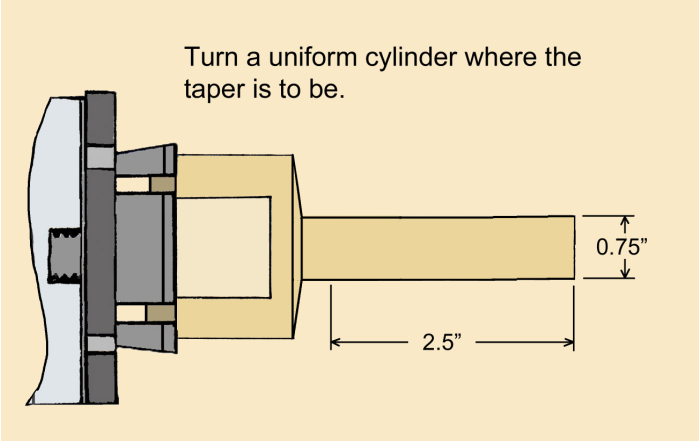 tailstock and use a point center
for support. Turn the portion that is to fit into the Morse taper down to a uniform
cylinder 0.75” in diameter.
tailstock and use a point center
for support. Turn the portion that is to fit into the Morse taper down to a uniform
cylinder 0.75” in diameter.
(4) Turn the taper. The diameter at the large end should be 0 .7”. At the small
end, 2.5” away, the diameter should be 0.57”. (In fractions, large end: just over
11/16”; at the small end: just over 9/16”.)
.7”. At the small
end, 2.5” away, the diameter should be 0.57”. (In fractions, large end: just over
11/16”; at the small end: just over 9/16”.)
(5) Test the fit in the Morse taper of the tailstock ram and make any adjustments you feel are needed. It doesn’t have to be perfect.