

Sanding, Part 3
General Comments and Applications
Finding the scratches. It always seems that scratches do not appear until you have sanded past the grit required to remove them. This means you have to back up to a lower grit to get rid of the scratches that appeared out of nowhere. This bit of experience points the way to a useful tip.
In most cases, the scratches or blemishes will not be uniformly distributed over the surface you are sanding. To find them, skip a grit or two and sand briefly with 240 or 320 just to make the scratches show up. Then use a lower grit to remove the scratches once you know where they are. (Credit goes to Earl Kennedy of the Piedmont Triad Woodturners Association for this suggestion.)
Scratches are easier to see under a spotlight as opposed to the diffuse lighting that is characteristic of fluorescents.
Sanding a finial. A finial is probably one of the smaller pieces that a typical turner will make. The small size, in some cases, can complicate the sanding process because areas in the detail simply may be hard to reach.
Use the factory edge of the sandpaper, which is usually crisp and sharply defined, to reach into narrow crevices. Another trick is to bend the paper back on itself to form a contour that matches small concave surfaces. This avoids having to apply pressure to the piece to get the abrasive to conform to the surface.
On work at this scale, the sandpaper can remove enough wood to actually change the
shape of the piece. This is usually a disadvantage, but on the other hand, you can
use the abrasive to refine the shape of small details.
disadvantage, but on the other hand, you can
use the abrasive to refine the shape of small details.
Do the sanding before reducing the diameter of areas that supply the driving force to parts that have a larger diameter. In extreme cases, the force exerted by the abrasive on the wood can twist the stem in two.
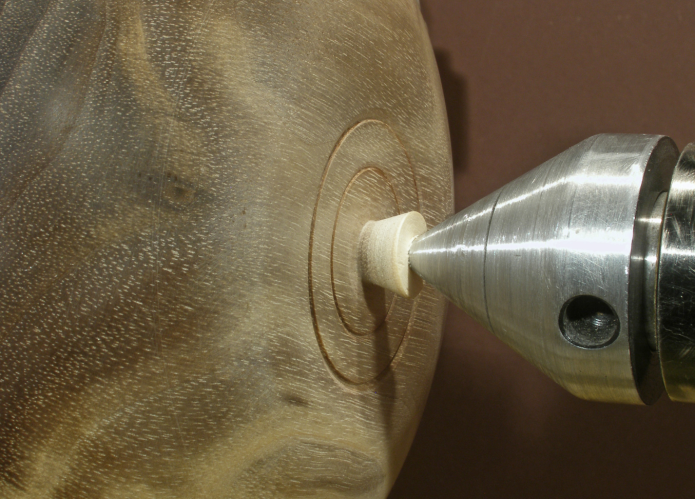
Cleaning up the footprint of a nubbin. In jam chucking to finish the foot of a bowl,
it is standard practice to turn away waste wood until only a small nubbin remains
for the tailcenter to press against. The nubbin is then removed by hand, and its
footprint sanded smooth. A Dremel-
The fact that this is easy to do makes it less desirable to turn the nubbin down to as small a diameter as you otherwise might be tempted to do. It is therefore less likely that the nubbin will break prematurely and let the workpiece come off the lathe.

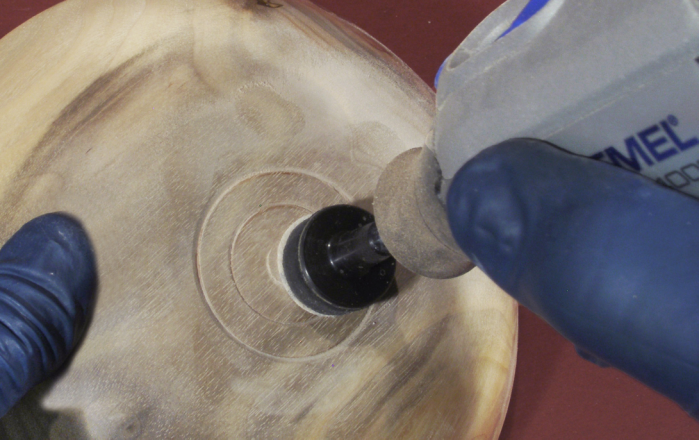

And finally, the photo at right shows the end result.
Sanding a vessel with voids. You must not attempt traditional sanding in the area of a vessel where there are significant voids. The same holds true for sanding a square bowl or a similar piece that has corners or wings. You can turn air (Gouges, Part 5), but you cannot sand it. Instead, use power sanding with the lathe stationary.
There is a safety issue involved, of course, but aside from this, significant rounding
of the edge will occur at the trailing edge of a void or the leading edges of the
corners on a square bowl. This occurs as the sandpaper makes contact with the wood
after sailing through the air, so to speak.
significant rounding
of the edge will occur at the trailing edge of a void or the leading edges of the
corners on a square bowl. This occurs as the sandpaper makes contact with the wood
after sailing through the air, so to speak.
Sanding spalted or degraded wood. Degraded wood will sand away quickly, but a complicating factor is that it often does not sand away evenly. Spalted wood, in particular, typically has hard and soft regions next to each other, and this can produce an uneven surface unless you’re careful with the sanding. More on this is given in the articles on working with spalted wood.
Sanding green wood. The problem is that wet wood tends to clog the sandpaper. However, for the lower grits, the heat produced by sanding will often dry the surface enough so that sanding dust will clear without clogging.
Why sand green wood? Good question. The only advantage I see is to get most of the sanding done before the wood warps and then wobbles so much that traditional sanding becomes difficult. Vessels with very thin walls will warp quickly.
My preference is to let the wood dry to the point where sanding dust will shed, and then use power sanding. I would rather deal with the problems of sanding a warped surface that is dry than the issues associated with sanding wet wood.
Sanding a finish. Two instances come to mind where you might find it useful to sand a piece to which one or more coats of a finish have been applied. One is after applying lacquer sanding sealer to fortify degraded wood in order to get a clean cut. The other is sanding to level the surface, to remove ripples, dust nibs, or other blemishes.
In both cases, it is important for the finish to be completely cured. Otherwise, the finish will clog the abrasive, and the whole undertaking will be a frustrating proposition. At least 24 hours should be allowed for the finish to cure, but a week is better. Do some experimenting and see what works for you.
Almost always, when sealer is applied to fortify a surface, most of the sealer will be removed by the finishing cuts that follow. Even so, some sealer will remain and may cause clogging during the sanding process.
Wet sanding. This technique uses a liquid, typically water, tung oil, or walnut
oil, as a lubricant to prevent clogging of the sandpaper. A water-
A few turners use, or at least have tried, wet sanding green wood to avoid the clogging issue. I have little doubt that it will work if you use enough water, but I have not ventured to try it. I think it would make a horrible mess.
Steel wool. Whereas sandpaper removes wood by simply scratching it away, steel wool utilizes a different cutting action. Each strand acts like a tiny scorp or inshave, and the resulting surface does not exhibit the characteristic scratches of sandpaper.
Steel wood may be specified as course, medium, or fine, or the “system of 0’s” may
be used; the more 0’s, the finer it is. Turners probably use 0000 (that’s four
oh) more than any other. I use it a lot, but many folks want no part of it. I know
of one long-
Admittedly, it has some issues. The wood can grab the pad and take it right out of your hand. Steel fibers get caught in the wood and can be a pain to remove. The strands can wrap around a small part like a finial and potentially snap it right off the lathe.
To maintain an effective cutting action, pull the pad apart frequently to expose new strands that are sharp. The pad will likely become loaded with dust before all the sharpness is used up, but you can blow it out with compressed air.
Steel wool is not good for leveling a surface because the flexibility of the pad allows it to follow the undulations in the surface. On the other hand, this same thing makes it good for dulling the surface of a film finish, to knock back the gloss to a satin sheen.
Summary – What I learned:
Here is a quick summary of the things I learned that changed my whole outlook on sanding:
1. Don’t buy cheap sandpaper.
2. Don’t use dull sandpaper.
3. Don’t sand at high speed.
4. Power sanding: the whole concept.
5. Drop back to a lower grit when necessary.
6. Don’t skip a grit.
7. Clear the dust with compressed air while sanding.
8. Let a finish cure completely before sanding.
9. You are more likely to get into the chuck jaws while sanding.
10. If a scratch or blemish doesn’t yield to the sanding in 10 or 15 seconds, something is wrong. Either the sandpaper is dull or too fine a grit is being used.
Links to Articles on Sanding (and a lot more).
On WoodCentral: http://www.woodcentral.com
Russ’s Corner – A series of articles by Russ Fairfield:
http://www.woodcentral.com/russ/russindex.shtml
Russ’s Five Rules of Sanding:
http://www.woodcentral.com/russ/finish2.shtml
Steve Russell’s article on interface pads:
http://www.woodturningvideosplus.com/power-
Check out this link for a different take on power sanding:
http://aroundthewoods.com/bowlsanding.html
Sources for sanding materials and accessories.
(In alphabetical order)
Angle drill: Go to Klingspor’s and search for “angle drill.”
Craft Supplies USA: http://www.woodturnerscatalog.com/
Klingspor’s Woodworking Shop: http://www.woodworkingshop.com/
Packard Woodworks: http://www.packardwoodworks.com
Rockler Woodworking: http://www.rockler.com
The Sanding Glove: www.thesandingglove.com/
VincesWoodNWonders: http://www.vinceswoodnwonders.com/
Woodcraft: http://www.woodcraft.com